
For those of you who I speak with in person (or even via Slack) you would know that I have been spending quite a lot of time with Terraform recently. The Infrastructure as Code space is one that I am very interested in, and as part of my learning process I have been helping one of our teams move off a python script used to instantiate nested testing environments, and onto Terraform.
As such, I was super interested when I heard that we were working on a Terraform plugin for vRealize Automation. It took me a while to get past the “but but but! We don’t do first class IaaS with vRA, so where is the value in this?”. In short, there could be some real benefits to providing composite elements in vRA that you can then tie together into an application stack.
Let’s start with a simple example of how this works with the Openstack provider.
resource "openstack_networking_network_v2" "this" {
  name = "${var.name}"
}

resource "openstack_networking_subnet_v2" "this" {
  name       = "${openstack_networking_network_v2.this.name}"
  network_id = "${openstack_networking_network_v2.this.id}"
  cidr       = "${var.cidr}"
}
Can you see how once the network resource is created, both the name and id are then used to create the subnet resource? This is an important concept in Terraform - we also make use of interpolation with properties and software components in vRA, so you may be familiar with this idea. To do this, you need to be providing outputs for the created infrastructure. Unfortunately, the implementation of the vRA provider in its current state only tracks the request - not the infrastructure itself. I’ve captured an example below.
{
    "version": 3,
    "terraform_version": "0.11.0",
    "serial": 1,
    "lineage": "8aceab2e-31d7-4fe6-93c5-a1d361424ee2",
    "modules": [
        {
            "path": [
                "root"
            ],
            "outputs": {},
            "resources": {
                "vra7_resource.this": {
                    "type": "vra7_resource",
                    "depends_on": [],
                    "primary": {
                        "id": "6fba442d-e3c0-4be0-9f95-c8e11b840d88",
                        "attributes": {
                            "catalog_configuration.%": "1",
                            "catalog_configuration.lease_days": "1",
                            "catalog_id": "0aedbcdc-0051-4d56-a496-7e8596172d09",
                            "catalog_name": "Linux VM",
                            "id": "6fba442d-e3c0-4be0-9f95-c8e11b840d88",
                            "request_status": "SUBMITTED",
                            "resource_configuration.%": "0"
                        },
                        "meta": {},
                        "tainted": false
                    },
                    "deposed": [],
                    "provider": "provider.vra7"
                }
            },
            "depends_on": []
        }
    ]
}
Compare this with a snippet of the tfstate from the same Openstack deployment example I provided at the beginning of the post:
"resources": {
                "openstack_networking_network_v2.this": {
                    "type": "openstack_networking_network_v2",
                    "depends_on": [],
                    "primary": {
                        "id": "a65db7f5-9c43-476d-bab9-202fcc2a2961",
                        "attributes": {
                            "admin_state_up": "true",
                            "id": "a65db7f5-9c43-476d-bab9-202fcc2a2961",
                            "name": "_lab_management_trans_net_1_a",
                            "region": "",
                            "shared": "false",
                            "tenant_id": "54b3297b33af4d72badbda3e8ab8612f"
                        },
                        "meta": {
                            "e2bfb730-ecaa-11e6-8f88-34363bc7c4c0": {
                                "create": 600000000000,
                                "delete": 600000000000
                            }
                        },
                        "tainted": false
                    },
                    "deposed": [],
                    "provider": "provider.openstack"
                }
}
The impact of this is that you don’t have the ability to interpolate values between resources in a given Terraform definition, or even make changes to the infrastructure you provision in vRA. When you update your definition, it will reflect in the tfstate file, but it will not change your infrastructure since the state file only holds the state of the request. In short, this provider only allow you to request an existing catalog item (one or many) and then destroy it. Do not expect to be able to change resources, update a lease value or any day two actions other than destroying your deployment.
With that caveat, you may ask yourself why you’d use it at all. I am hopeful that this behaviour will be changed, and in the meantime I am getting some value out of using this for content development - having to enter 10 to 20 property values each time I submit a request gets old very quickly. With this provider, it makes that pain go away. Let’s start simple, and work our way up to a more complex request.
To get started, head on over to the repo and follow the readme to get the provider compiled.
Getting setup with your base description is quite straightforward. An example of a single machine blueprint is as follows:
provider "vra7" {
#--- Update terraform.tfvars for these details
    username = "${var.username}"
    password = "${var.password}"
    host     = "${var.host}"
    tenant   = "${var.tenant}"
    insecure = true
}

resource "vra7_resource" "this" {
    catalog_name = "Linux VM"

    catalog_configuration = {
        lease_days = 1
    }

    resource_configuration = {
        machine_0.cpu    = 1
        machine_0.memory = 1024
  }
}
The source can be found here.
That is all pretty straightforward, although it feels a little strange to use “catalog_configuration” for deployment level configuration items.
Onto something a little more complex - a machine with properties.
In the screenshot below, you’ll see a free text field called “Property Label”. This is the label for a property called (rather creatively) PropertyDefinition.
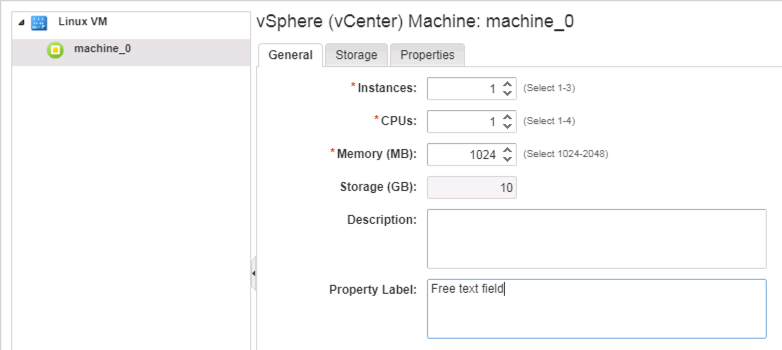
Be aware that you need to use the name of the property, and not the label. You can’t simply look at the request form to get that data.
In this case, the resource_configuration block would be:
resource_configuration = {
    machine_0.cpu    = 1
    machine_0.memory = 1024
    machine_0.PropertyDefinition = "Some random text."
}
In a similar fashion, you can’t use machine_0.instances - you need to use machine_0._cluster (the property name for instances).
The takeaway from this is that you need a pretty good understanding of your blueprint in order to get this right.
Finally, let’s look at a blueprint that uses software components. Software components have their own namespace, which are displayed on the request form (assuming you aren’t wrapping your form in XaaS). Take a look at the image below, and you’ll note that the software component is called SQL2016_Install_2. This is the namespace we start with, and then you append the property after that.

Clicking through the various options required to do validation of this particular blueprint is a serious pain. Instead, I can simply describe all of the required values as part of the resource_configuration as shown below. For items that I want to control more closely (such as ensuring I don’t reuse a cluster name that registers to AD) I can not specify the variable, and simply enter it as part of my terraform apply.
resource "vra7_resource" "this" {
    catalog_name = "SQL 2016 Enterprise AAG Cluster"

    resource_configuration = {
        SQL2016_Install_2.SA_PWD                           = "${var.sa_pwd}"
        SQL2016_Install_2.INSTANCE_NAME                    = "${var.instance_name}"
        SQL2016_Install_AAG_Cluster.AlwaysOnAgName         = "${var.alwayson_ag_name}"
        SQL2016_Install_AAG_Cluster.AlwaysOnAgDatabaseName = "${var.alwayson_ag_database_name}"
        Create_Failover_Cluster_1.ClusterIPAddress         = "${var.cluster_ip_address}"
        Create_Failover_Cluster_1.ClusterName              = "${var.cluster_name}"
        SQL2016_Install_1.SA_PWD                           = "${var.sa_pwd}"
        SQL2016_Install_1.INSTANCE_NAME                    = "${var.instance_name}"
  }
}
You can find the source for this example here.
I have taken the liberty of carving up the examples here, but hopefully you can see how these can be combined together within your own environment. That wraps up this post - time to go log some issues!