
I’ve been working with a number of customers recently to upgrade their environments to vRA7, and one of the most common questions that is coming up is how we can emulate the relationships that were available in 6.x. The good news is that we don’t need to emulate them at all – a method exists for handling these relationships and it is a lot more powerful (and simple!) than the previous XML approach.
In this post I’m going to provide a real scenario with scrubbed and simplified examples of how we implemented a relationship model for a customer environment using vRA7.
The scenario? Based on location selection, present available “zones”, and then the available networks within those zones for selection.
Before we start, I’d like to point out one of the issues from the previous XML based approach, and that is that we could only have a single parent:child relationship per selection. That means that in this use case, “zones” would need to be uniquely named (syd-web/melb-web for example) as there was no way to combine the site and the zone together to create a more complex filter. Enter the new Property Definition integration with vRO Actions!
Let’s start simple, and yes you are right – there is no need to use an action for this first step, but it’s a nice way to get your feet wet.
Creating an Action to return Datacenter values.
-
Login to the vRO client, and select the Actions tab.
-
Right click on the top of the tree (does anyone know what this is rightly called?) and select New module. I called my folder vra.property.relationships but you can call this whatever you like.

-
Right click on this folder, and select Add action. Name it “datacenterLocations” (or whatever you prefer).
-
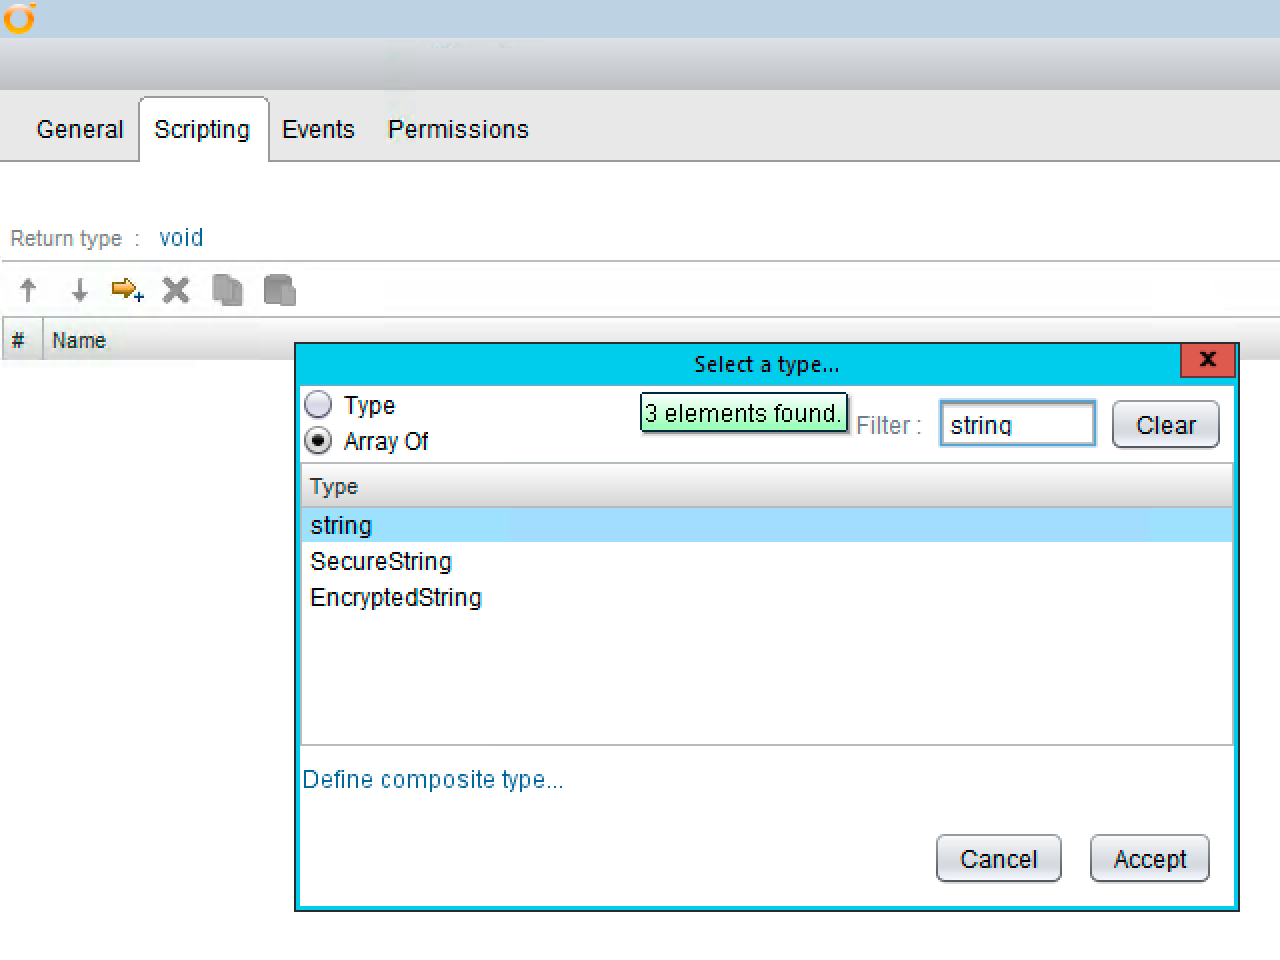
The new action will open automatically for editing. When it does, click on the hyperlinked return type of Void as shown in the image below. Our locations (and in fact each of the returns in this post) are going to be a number of different strings. So our return type needs to be set to Array of string.
Click Accept to be sure the selection sticks.
As mentioned at the beginning of this section, this action is really simple. We are just returning the defined values for our Datacenter Locations (as you would have configured already in your DatacenterLocations.xml file).
- In the main body of your action, add the following:
return ["Sydney","Melbourne"];
-
Now click Save and close.
-
Return to vRA and login as a user with either Fabric Administration or Tenant Administration rights.
-
Navigate to the Property Definitions section (Administration > Property Dictionary > Property Definitions)
-
Create a new Property Definition as shown below, and when you click on the External values radio button, the interactive dialog will pop up.
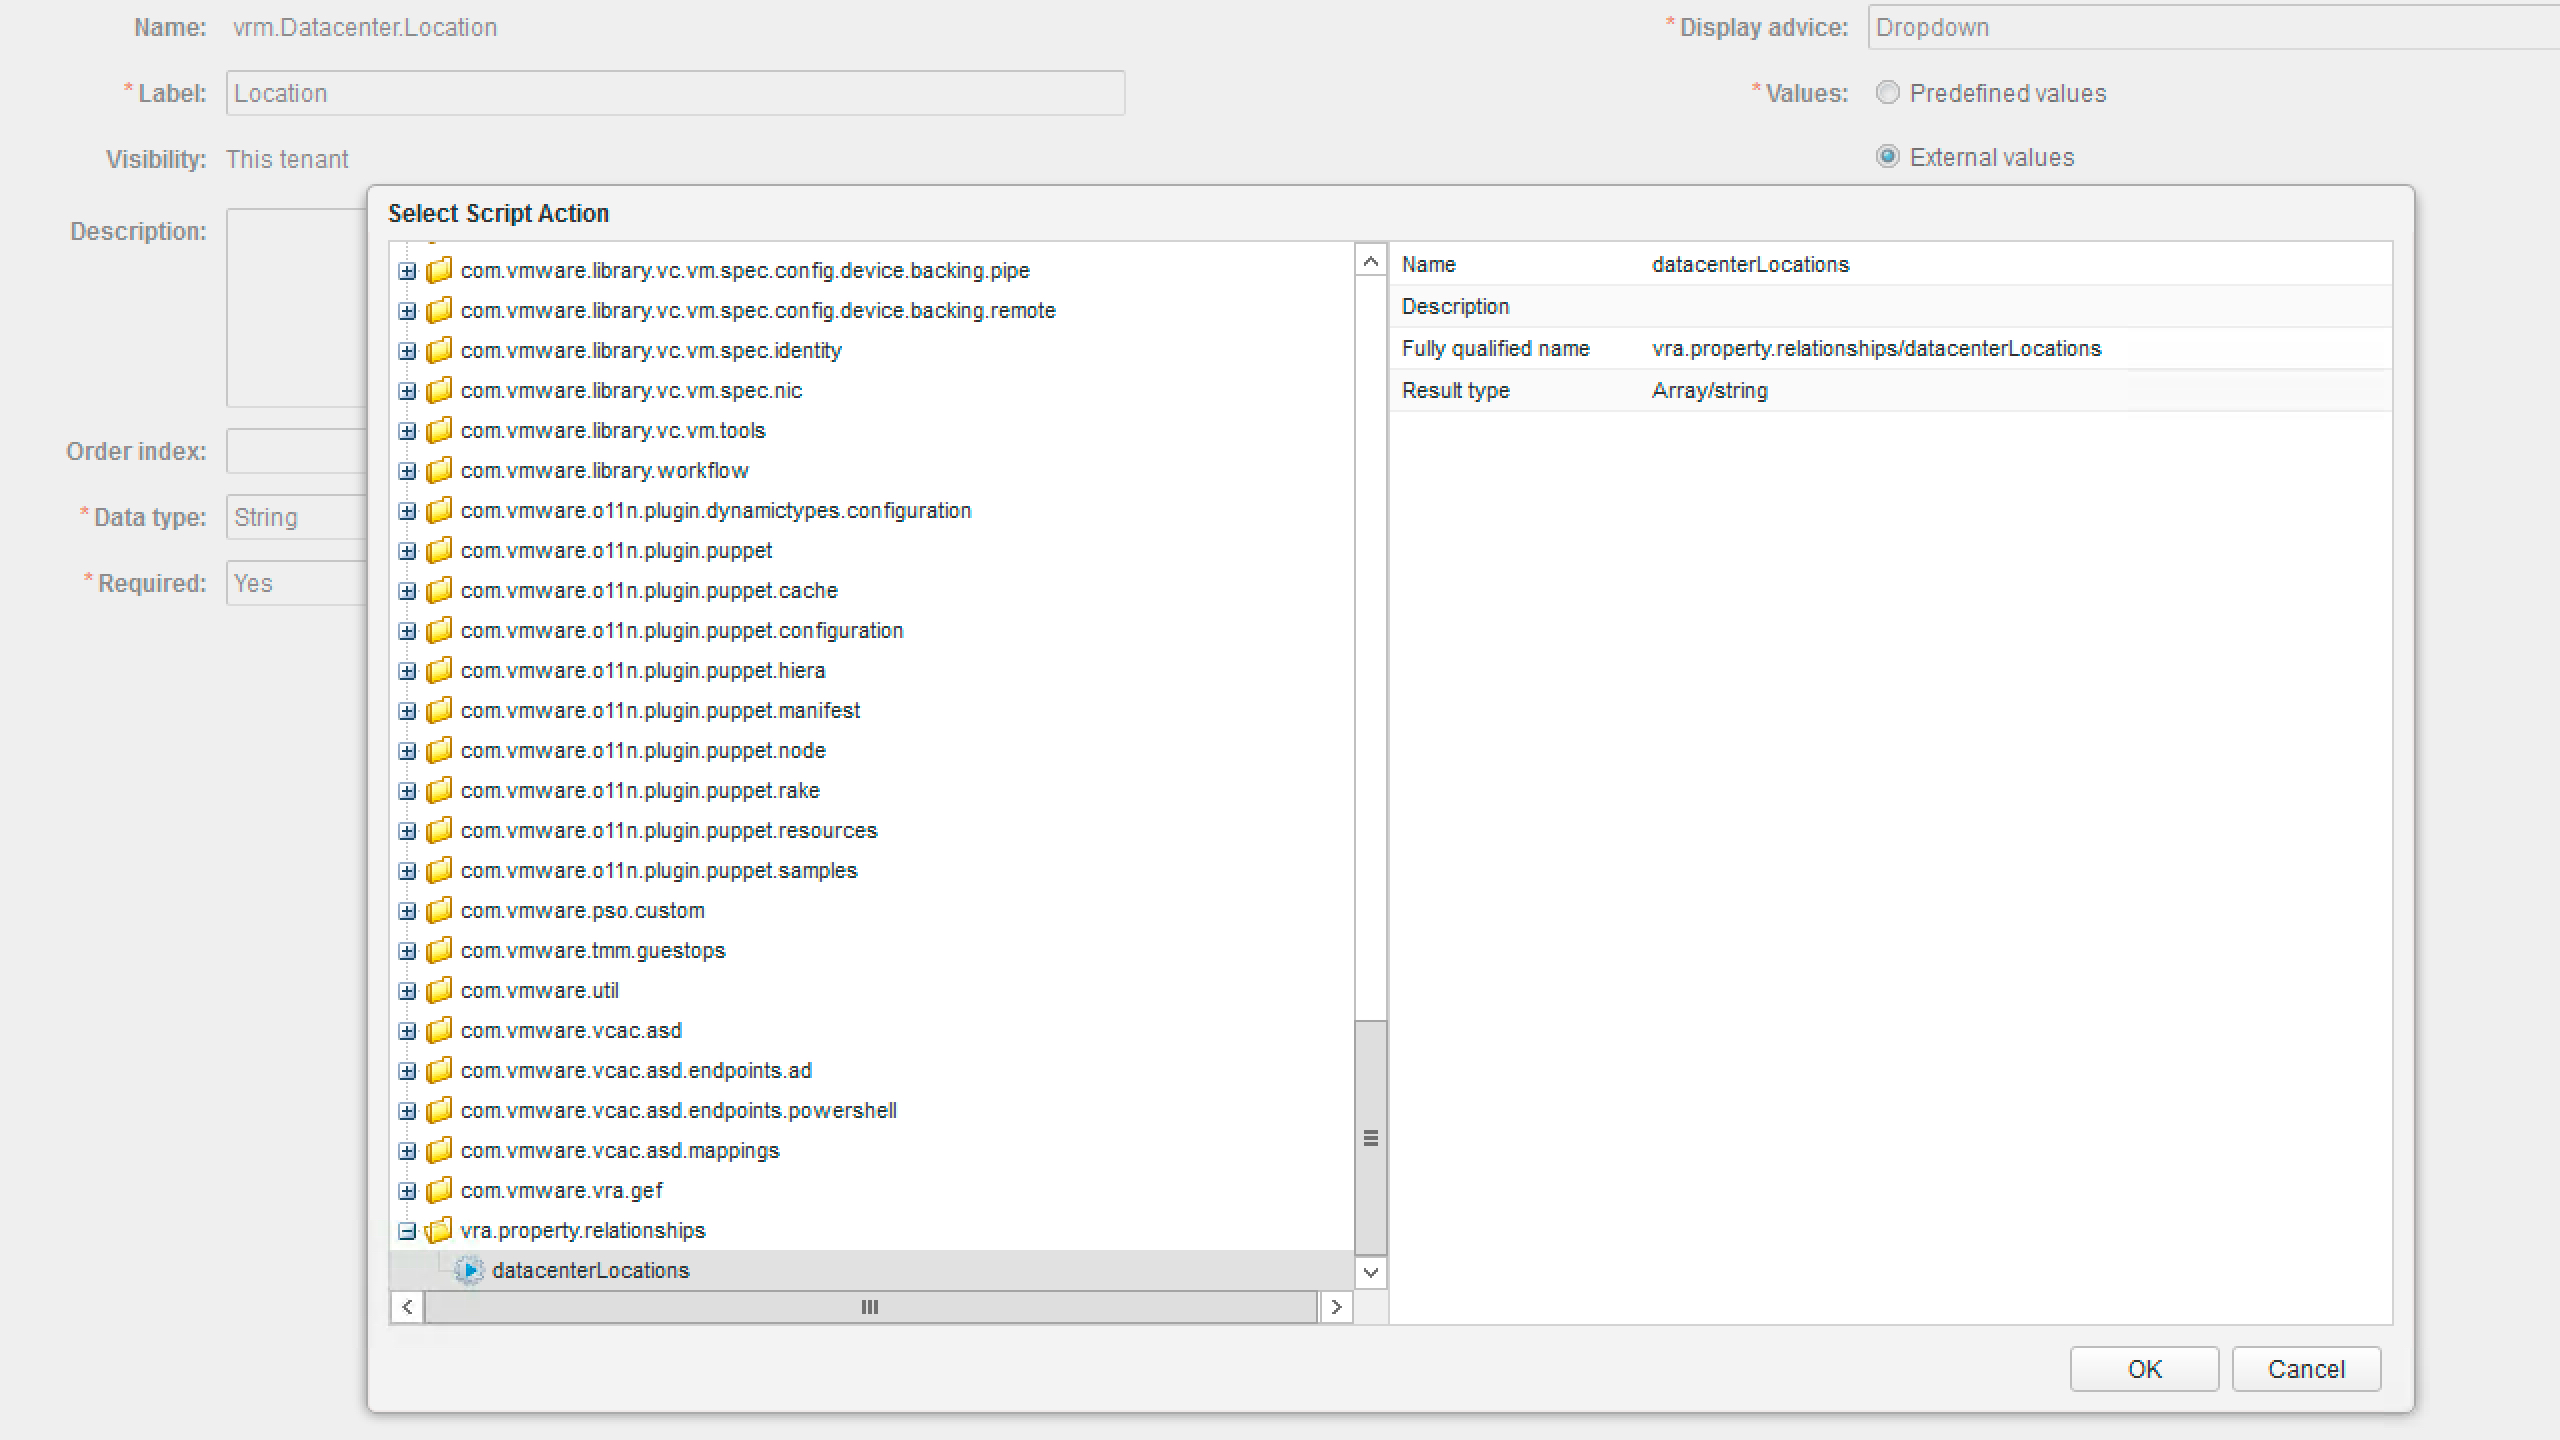
-
Choose your newly created action and click OK.
-
When you return to the Property Definition page, click OK to save it.
Onto our next action!
Creating an Action to Return Zone Values Using Datacenter Location as an Input.
Since I expect you were paying close attention to the previous set of instructions, I’m not going to repeat them. I will simply ask you to head back to the vRO client and create a new action called networkZone in the same folder. You will remember to update the Return type won’t you?
Since we want to return values based on the selected Location value from the previous step, we won’t just be writing another return statement. Instead, we will take the input and use a case statement to return a unique string of values based on that input. But where do we define that input?
-
Click on the yellow arrow under Return type to create a new attribute.
-
Click on the attribute to name it something meaningful. I have called mine “datacenterLocation” just so that others can look at these actions and make a bit of sense of them.
-
In the body of the action, drop the following:
if(datacenterLocation){
    switch(datacenterLocation){
	case "Sydney": return ["Web","Application","Database"];
	case "Melbourne": return ["Web","Application","Database","Sandbox"];
    }
} else {
    return ["Please Select a Location."];
};
As you can see, we have two case statements, but first we are checking to see that the datacenterLocation value exists. If it doesn’t then the return will prompt us to select a Location.
-
Click Save and close.
-
Return to vRA, you should still be at the Property Definition page.
-
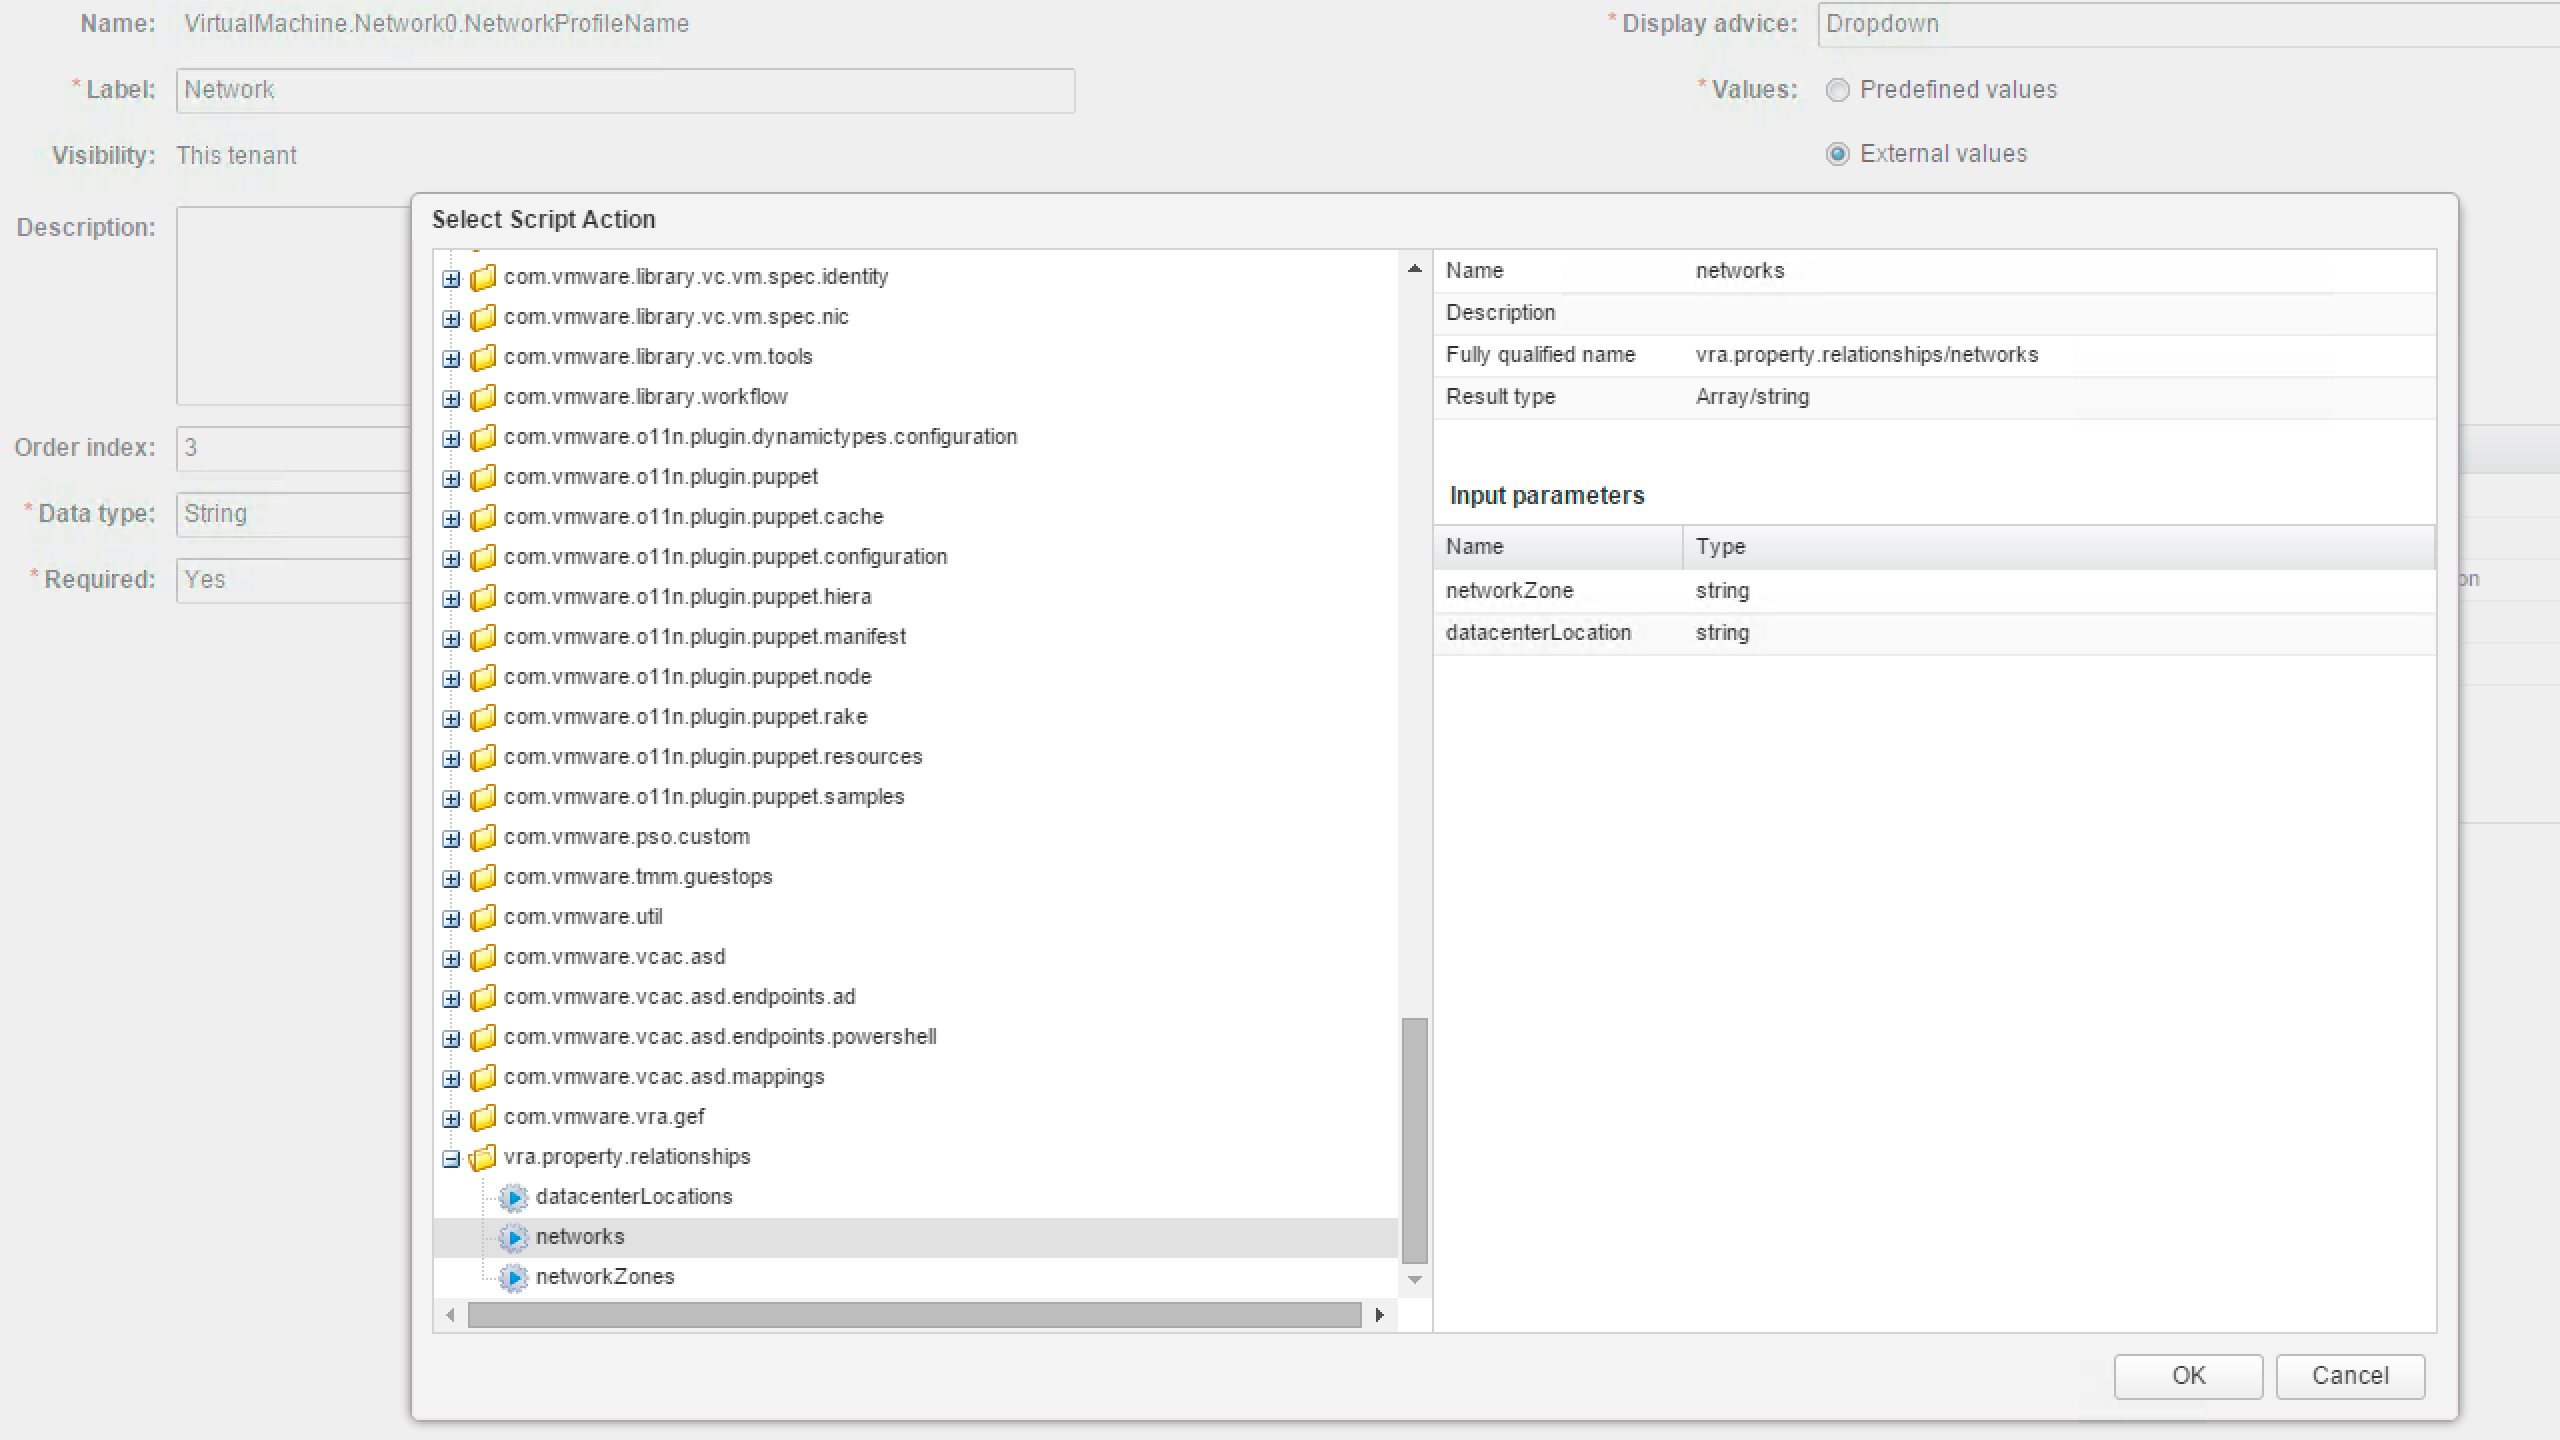
Create a new Property Definition as shown below, selecting your new action.

-
In order to bind the attribute to our Datacenter Location property, click the datacenterLocation input parameter.
-
Place a tick in the Bind, and select vrm.Datacenter.Location from the list of dropdown values.

- Save your Property Definition and head back to the vRO client for the last of our actions.
Creating an Action to Return a Network Based on Two Inputs.
Ok, the final step – and the most complex. You’ll note that in the previous step we allowed for zone selection. Both the Sydney and Melbourne sites have Web, Application and Database zones, the only unique zone is the Sandbox for Melbourne. What does this mean? In order to return the appropriate networks, we need to consider both the location and network zone values. We will do this by evaluating both the “datacenter location” and “network zone” conditions.
-
Create an action in the previously created folder called “networks”, set the input to “Array of string”, and add two attributes.
-
Rename the attributes to “datacenterLocation” and “networkZone” (just click on the names to rename).
-
In the body of the action paste the following:
if (networkZone) {
	switch (networkZone) {
		case "Web": {
			switch (datacenterLocation) {
				case "Sydney": return ["VLAN103 - Web Dev","VLAN104 - Web Prod"];
				case "Melbourne": return ["VLAN203 - Web Dev","VLAN204 - Web Prod"];
	 			default : return ["No networks avalable."];
			}
		}
		break;
		case "Application": {
			switch (datacenterLocation) {
				case "Sydney": return ["VLAN105 - App Dev","VLAN106 - App Prod"];
				case "Melbourne": return ["VLAN205 - App Dev","VLAN206 - App Prod"];
	 			default : return ["No networks available."];
			}
		}
		break;
		case "Database": {
			switch (datacenterLocation) {
				case "Sydney": return ["VLAN107 - DB Dev","VLAN108 - DB Prod"];
				case "Melbourne": return ["VLAN207 - DB Dev","VLAN208 - DB Prod"];
	 			default : return ["No networks available."];
			}
		}
		case "Sandbox": {
			switch (datacenterLocation) {
				case "Melbourne": return ["VLAN209 - Sandbox"];
	 			default : return ["No networks available."];
			}
		}
		break;
	}
}
else return ["Select a Network Zone."];
Although more complex that the previous example, you can see that we are checking first to see if the “Network Zone” value has been populated. We don’t bother to check the “Datacenter Location” value exists, since the existence of the “Network Zone” value has already done that for us. Once this is validated, we break things down. In the case of the “Network Zone” being Web, we then do a second switch for “Datacenter Location”, in the case of our two locations Sydney and Melbourne.
This process repeats for the Application zone, the Database zone and the Sandbox zone.
Let’s head back to the vRA portal and get this final property created.
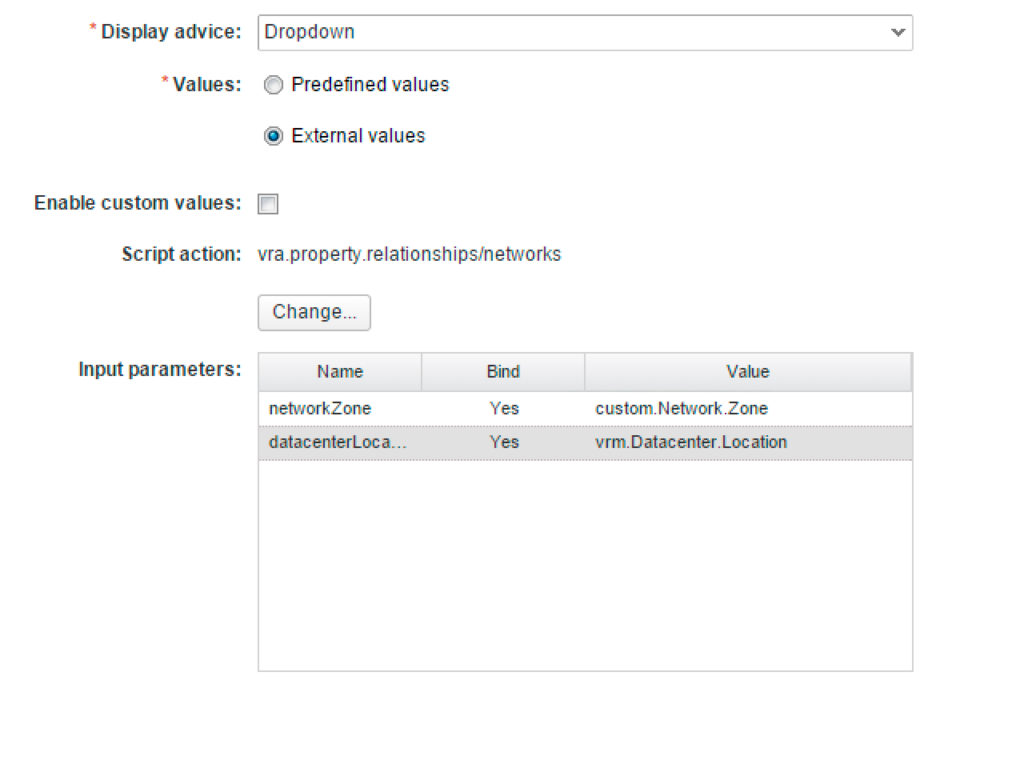
- Create a new Property Definition as shown below, selecting your new action.
-
Place a tick in the Bind checkbox for “networkZone” and select custom.Network.Zone from the dropdown list. Repeat for datacenterLocation, but choose vrm.Datacenter.Location from the dropdown.
-
Save your Property Definition and then click on Property Groups. We will group these up to make it easier to consume on our blueprints.

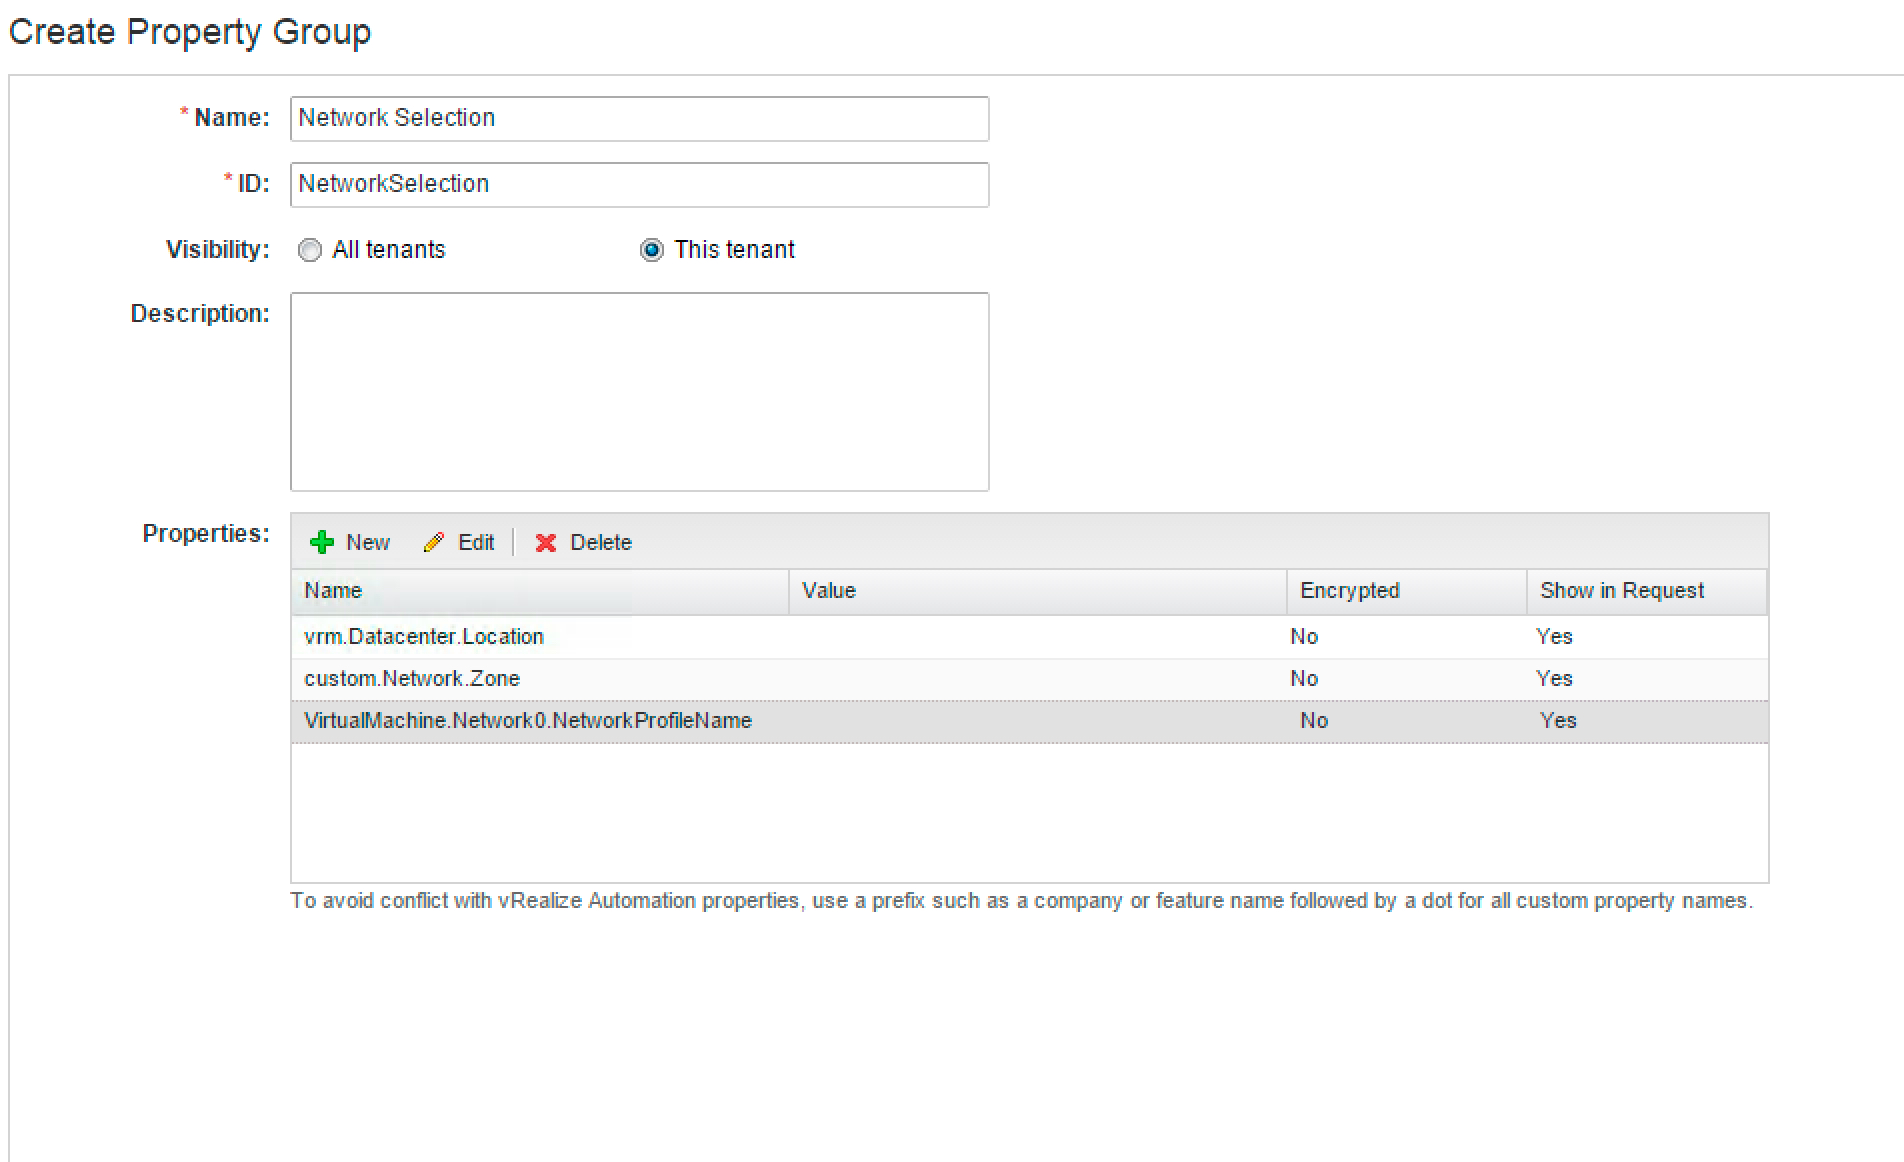
Note: In case it isn’t clear from the screenshots, set the “order” of your custom properties as follows:
vrm.Datacenter.Location : 1
custom.Network.Zone : 2
VirtualMachine.Network0.NetworkProfileName : 3
These numbers are about position on the request form relative to properties with other order values.
- Create a new Property Group and select the three Property Definitions that you just created. Ensure that the check box for “show in request” is selected, and click OK to save.
Assigning the Property Group to a Blueprint
-
Make sure that you are logged in as a user with the Infrastructure Architect role.
-
Navigate to the Design tab, and select your blueprint.
-
Click on a Virtual Machine object, and then select the Properties tab.
-
In the Property Groups, click Add.
-
Select your Property Group, and click OK. Finally, click Finish to save your blueprint.
With that, you are done. I’m sure that you will find some other ways to apply this post, please leave any questions in the comments sections.
UPDATE: Take a look at this post from Dennis, that extends out simple returns to more complex examples.